How to Start a Blog in 2026: Easy Guide for Complete Beginners

Five years ago, I was stuck in a small office, dreaming about having more freedom while staring at spreadsheets all day. Now, I work from home and run several online businesses that help me pay the bills.
This blog isn’t another quick way to get rich. I’ve tried enough of those to know better. Instead, this is my honest story about building a business online with real wins, mistakes, and lessons I had to learn the hard way.
Whether you’re just getting started with an online business or already working on your own ideas, I made this space to share what works, what doesn’t, and everything I wish someone told me when I began.
In this guide, I’ll show you how to start your own blog, step by step. I’ll also share easy tips I’ve learned from experience—advice I wish I had when I first started.
What is a blog?
A blog is a website where you regularly share articles about topics you enjoy or know well.
Unlike regular websites that stay mostly the same, blogs get updated often with new posts. These posts usually appear with the newest ones at the top.
Blogs can cover virtually any subject—from cooking and travel to personal finance or parenting tips. What makes blogs special is their conversational tone and personal perspective, creating a more authentic connection with readers than formal content typically found on corporate websites.
Why you should start a blog?
Starting a blog is a great way to share your thoughts, skills, or passions with the world. Whether it’s a recipe you’ve perfected, a DIY project, or tips from your daily life—someone out there is looking for exactly what you know.
Blogging also helps you connect with people who share your interests. When I started blogging about online business strategies, I never expected to build relationships with fellow digital innovators from across the globe. These connections often extend beyond the digital world into real friendships and professional opportunities.
Beyond personal fulfillment, blogging can establish you as an authority in your field. Whether you’re passionate about sustainable fashion or vintage car restoration, consistent blogging demonstrates your expertise and builds credibility with your audience.
And yes, blogs can become income sources through various channels like advertising, affiliate marketing, or launching your own products. Many successful bloggers started with nothing but a passion and a consistent posting schedule.
Most of all, your blog becomes your space online. It’s a way to share your voice, help others, and leave something meaningful behind.
Ready? Let’s get started.
Step 1: Choose Your Blog Niche
One of the biggest mistakes I made when I first started blogging was trying to write about everything. One day I was sharing a recipe, the next day I was talking about fitness, and then giving travel tips. It didn’t work.
Instead, pick one specific niche that you’re genuinely passionate about and that your target audience cares about.
Ask yourself these questions:
- What topic could I talk about for hours without getting bored?
- What skills or experiences do I have that others might find valuable?
- What problems am I uniquely positioned to help solve?
- Is there an audience actively searching for this type of content?
For example, instead of starting a general “lifestyle” blog, you might focus specifically on “budget-friendly home organization for busy moms” or “beginner-friendly plant care for apartment dwellers.”
You should also search for your topic on Google or use tools like AnswerThePublic. Look at the questions people are asking — if there are lots of them, that’s a good sign.
Need Ideas? Here Are Some Popular Blog Topics you might want to think about:
- Personal finance and budgeting tips
- Home improvement and DIY projects
- Healthy cooking and meal planning
- Fitness and wellness for busy people
- Parenting advice and family life
- Travel tips and destination guides
- Career development and productivity
- Pet care and training
- Technology reviews and tutorials
Step 2: Choose Your Blogging Platform
Before you start writing blog posts, you’ll need to choose a platform to build your blog. There are a few popular options out there, like Blogger, Wix, and Squarespace.
I actually started my first blog on Blogger because it was free, but I quickly hit limitations that made it hard to grow or customize.
After trying multiple platforms, I can tell you that WordPress.org is hands down the best choice for serious bloggers.
Why WordPress? It powers over 45% of all websites on the internet because it’s flexible, beginner-friendly, and built to grow with your blog. It gives you full control over your content, design, and features — something many free platforms don’t.
At first, WordPress might look a little intimidating but don’t worry. Once you start using the dashboard, it becomes much easier.
You can also install themes and plugins with just a few clicks to make your blog look and work the way you want.
If you’re serious about blogging or even planning to make money from it one day, WordPress.org is the best long-term choice.
Step 3: Get the Right Web Hosting
To make your blog live on the internet, you need web hosting. Think of it like renting a small space online where your blog lives.
When people visit your site, your hosting provider shows them your content — 24/7.
A good host makes your site faster, more reliable, and easier to manage.
For beginners, I recommend these hosting providers:
- Bluehost: WordPress recommended and beginner-friendly
- SiteGround: Great customer support and fast loading times
- HostGator: Affordable with good uptime
- DreamHost: Solid performance with unlimited bandwidth
I personally use Bluehost and have been happy with them.
Their one-click WordPress installation made setup a breeze, and when I encountered issues with my SSL certificate not working properly, their support team guided me through the step-by-step process to resolve it.
You can start for just a few dollars per month.
Step 4: Set Up Your Blog
Once you’ve picked your web hosting provider, it’s time to set up your blog. Don’t worry — it’s way easier than it sounds, especially if you use a beginner-friendly host like Bluehost.
Bluehost is officially recommended by WordPress and powers millions of websites. It walks you through everything step-by-step, so you won’t get stuck. You can have your blog up and running in less than 30 minutes.
Here’s what you get with a Bluehost hosting plan:
- Free domain name for the first year
- Free SSL certificate to make your site secure (shows the little lock icon)
- One-click WordPress installation (no coding needed)
- 24/7 customer support via chat or phone
- 30-day money-back guarantee if you change your mind
- Fast and secure hosting with solid uptime
Here’s how to get started:
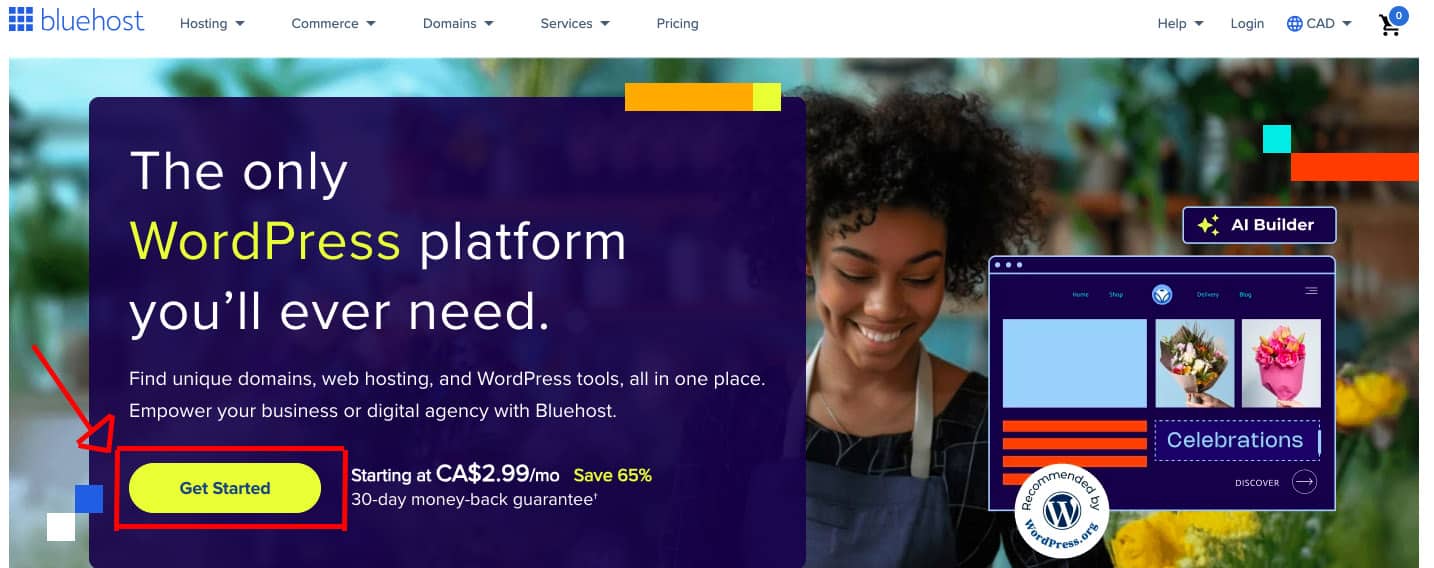
1. Go to Bluehost and click the “Get Started” button.
2. Pick a hosting plan.
You’ll see a few pricing options. For most beginners, the Basic Plan is perfect. It includes all the essentials for one blog and is the most affordable.
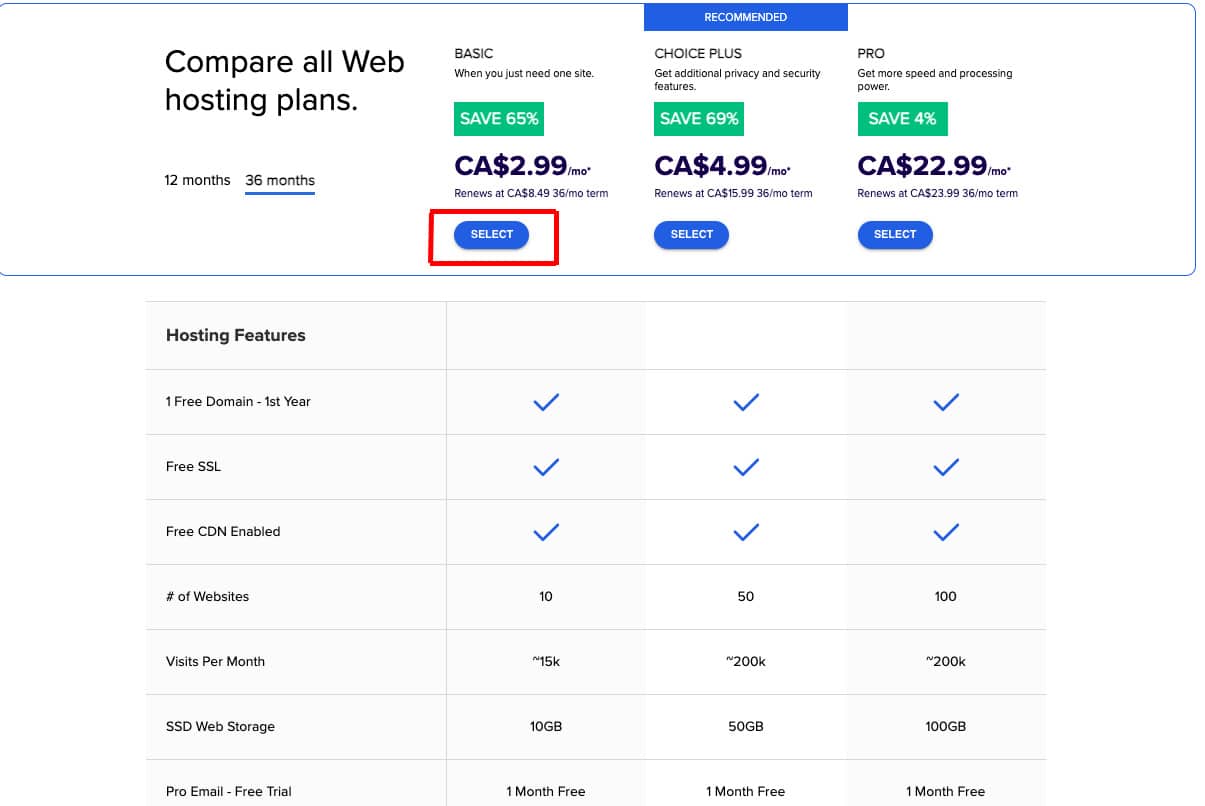
If you plan to run more than one blog or want more features, you can choose the Plus or Choice Plus plan. But if you’re just starting out, stick with the Basic plan to keep things simple.
3. Choose your domain name
Next, Bluehost will ask you to choose a domain name. This is your blog’s address on the internet (like yourname.com or myblogjourney.ca).
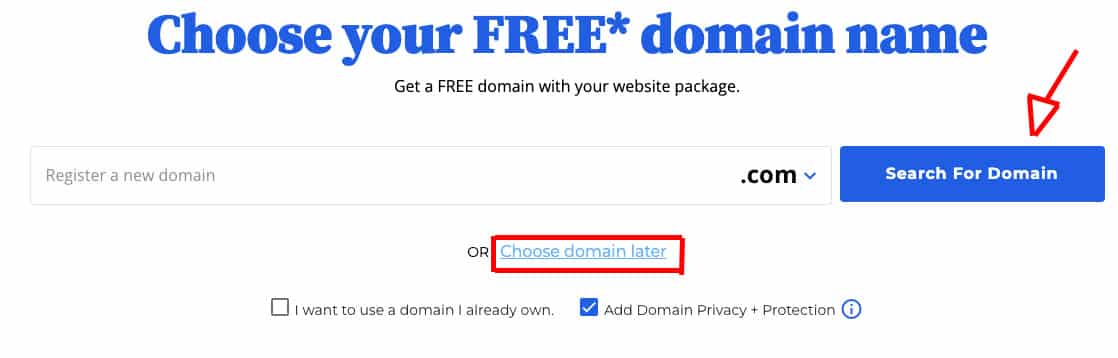
Tip: Keep it short, simple, and easy to remember. If the name you want isn’t available, you can pick a different one or choose it later.
If your desired name is already taken, Bluehost will give you some alternatives, or you can click “Choose later” if you need more time to decide.
4. Enter Your Account and Payment Details.
Now, you’ll create your account by entering your name, email, and payment details. Bluehost offers billing options for 12, 24, or 36 months.
Paying for 12 months upfront will give you the lowest price and save you money compared to paying monthly.
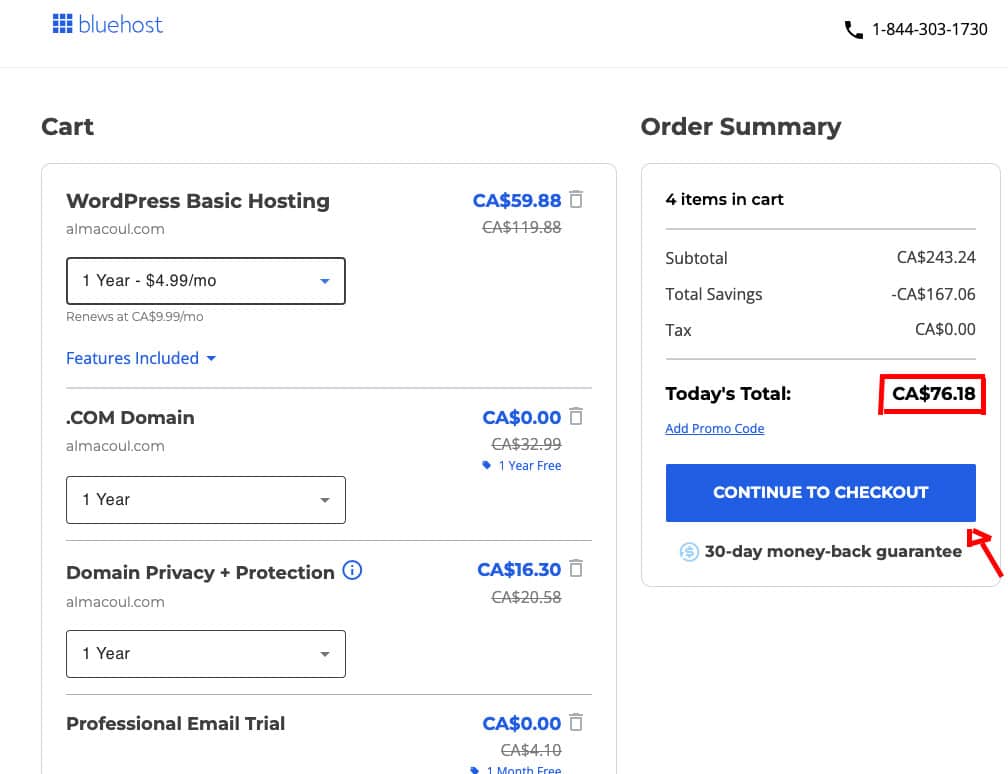
5. Review Add-On Options
You’ll see a few extra services already selected—some helpful, others not necessary for beginners.
I recommend keeping “Domain Privacy Protection” checked. It hides your personal contact details (like name, email, and address) from public databases when you register your domain.
You can uncheck the other add-ons, such as SiteLock or SEO Tools. They’re optional and not needed when you’re just starting out.
6. Complete your payment and create a password for your account.

After checkout, Bluehost will automatically install WordPress for you.
If you see a quick setup wizard, just answer a few questions, and Bluehost will handle the rest.
Once it’s done, you can log into your blog’s dashboard and start customizing your site!
Check your email for login details and your confirmation receipt. If anything feels confusing, don’t worry — Bluehost’s support team is available anytime, and they’re helpful.
You’re now ready to move on to designing your blog.
Step 5: Get Started With WordPress
Now that your hosting is set up, it’s time to start building your blog with WordPress — the tool you’ll use to write posts, customize your design, and manage everything on your site.
1. Log Into Your Blog
You’ll use two different login details when working on your blog:
- Bluehost login – You’ll use this to manage your hosting account (billing, domains, and technical stuff).
- WordPress login – This is your main login to write blog posts, change your site’s layout, and manage content.
To log in to your blog, visit: yourdomain.com/wp-admin (Replace yourdomain.com with your actual domain name.)
Use the username and password you created during setup. If you’re not sure what they are, check the welcome email Bluehost sent you after you signed up.
Once you log in, you’ll land on the WordPress Dashboard. It might look a little overwhelming at first, but don’t worry — you’ll get comfortable with it quickly.
2. Adjust Basic WordPress Settings
Before you start writing posts, let’s make a few quick changes to your blog’s settings to get everything ready.
Go to: Settings > General
- Site Title – This is the name of your blog (e.g. “Healthy Life Tips”)
- Tagline – A short sentence that explains what your blog is about (e.g. “Simple Wellness Tips for Busy People”)
Still in Settings > General, make sure your site URL starts with https:// instead of http://. If not, contact Bluehost support to make sure your free SSL certificate is working. This keeps your site secure.
Make sure the email listed is one you check often. WordPress will send you important messages here.
Scroll down to the Timezone section and choose your local timezone. This helps if you want to schedule posts to publish at a certain time.
3. Set Up Clean Blog URLs
Now go to: Settings > Permalinks
Select the “Post name” option. This makes your blog post URLs look clean and easy to read.
For example: yourdomain.com/how-to-start-a-blog instead of something messy like: yourdomain.com/?p=123
Click Save Changes at the bottom of the page when you’re done.
4. Install Essential WordPress Plugins
Install Essential WordPress Plugins. Plugins are like apps for your blog. They add helpful features without needing coding.
Here is how to install a WordPress plugin:
- Go to Plugins > Add New.
- Search for “Plugin Name” on the search bar.
- Click Install Now, then click Activate.
I recommend installing these 3 important plugins to start with:
- Yoast SEO – Helps your blog get found on Google.
- Wordfence Security – Protects your blog from hackers.
- Contact Form 7 – Adds a contact form to your blog.
Step 6: Make Your Blog Look Professional
Now that your blog is live, it’s time to make it look like a real website instead of the basic WordPress template.
Finding the right theme: Go to Appearance > Themes in your WordPress dashboard, then click “Add New”.

You’ll see tons of free themes to choose from. You can also upload a premium theme if you’ve bought one elsewhere.
What is a WordPress theme?
Think of it like choosing an outfit for your blog. The theme decides everything about how your site looks – the colors, fonts, where things are placed, how it looks on phones, all of it.
The cool thing is you can change themes anytime without losing your content.
My top theme recommendations:
- Astra – It’s fast, works great on mobile, and doesn’t slow down your site
- Kadence – Super flexible and has both free and paid versions
- GeneratePress – Simple and clean, perfect for beginners who don’t want complicated features
Customizing your chosen theme: Once you pick a theme, go to Appearance > Customize. This opens up a live preview where you can change things and see how they look instantly. It’s pretty cool actually.
Essential customizations to do:
- Upload your logo (even a simple text logo works fine)
- Pick colors that don’t hurt people’s eyes
- Set up your main menu with links to your important pages
- Add a short tagline that explains what your blog is about
Here’s something nobody tells beginners – you don’t need a fancy logo right away. My first blog just used text for the logo for six months, and it worked perfectly fine.
Creating your essential pages: Before you launch, you need some basic pages that every legitimate blog has.
Go to Pages > Add New to create these:
- About Page – Tell people who you are and why you started this blog
- Contact Page – How people can reach you (use a contact form plugin)
- Privacy Policy – Required by law in most places now
- Disclaimer – Covers you legally if you give advice or review products
Writing these pages feels boring compared to blog posts, but they’re super important. People actually read About pages more than you’d think.
I use free generators online for my privacy policy and disclaimer – no need to reinvent the wheel.
Time to go live: Here’s the exciting part – making your blog visible to the world. If you’re using Bluehost like I do, there’s one important step you can’t forget.
Your hosting provider probably put up a “coming soon” page while you were building your site. You need to turn that off so people can actually see your blog.
In your WordPress dashboard:
- Go to Settings > General
- Look for something like “Coming Soon” or “Maintenance Mode“
- Turn it off
- Hit Save
Now open a new browser tab and type in your domain name. If everything worked right, you should see your actual blog instead of a placeholder page.
Step 7: Write Your First Blog Post
your first post probably won’t be perfect, and that’s totally fine. I cringe when I read my early posts, but they were necessary stepping stones.
Getting started with your first post: If you’re looking to create a new post, simply head over to the “Posts” section and click on “Add New”.
The WordPress editor will open up, and you’ll see a blank canvas waiting for your content.

Tips for your first post:
- Write about something you know well
- Keep it between 1000-1500 words
- Use headings to break up the text
- Add at least one image
- End with a question to encourage comments
Don’t worry about SEO optimization too much on your first few posts. Focus on writing helpful, engaging content. You can always go back and optimize later.
If you want to learn how to create engaging content faster, check out my guide on How to Use AI to Write Blog Posts. It’ll show you some practical techniques to overcome writer’s block and produce quality content more efficiently.
Final Thoughts
Starting a business blog has helped me grow in ways I never expected. What started as a small idea turned into a space where I now help thousands of digital entrepreneurs.
By following the steps in this guide, you’ve already made great progress—well done!
Keep in mind that building an online business takes time. You’ll face some challenges, but if you stay focused, keep learning, and try new things, you can succeed.
Whether you want to share your knowledge, connect with others, or make money online, your blog can be the first step toward something big.

How to Create Custom Reports in ClickUp: Step-by-Step Tutorial

How to Create a Successful TikTok Shop from Home
How to Set Up a Mailchimp Account
About Author
Alma Coul
Alma is the founder and CEO of Eagles Digital. He is an SEO expert and has over seven years of experience in Web programming and building visibility for businesses through content marketing.